|
|
 |
Ocular Motility Photography
Equipment and Technique
Gary E. Miller, CRA
Geisinger Medical Center
Danville, PA
Illustrations by Diane Latranyi
Equipment and Technique
Either film or digital cameras may be used for ocular motility photography. Digital photography is rapidly replacing film imaging as the tool of choice. The equipment list and method for making composites are different, but the techniques for acquiring the images remain the same.
- Equipment for film imaging:
- 35mm SLR camera
- 105mm lens
- Flash unit (camera mounted) or studio strobe
- 100 ISO film
- Equipment for digital imaging:
- Digital SLR camera
- 85mm lens
- Flash unit (camera mounted) or studio strobe
Using a 35mm film camera and a 105mm lens, set the lens to a ratio of 1:4. This is the typical magnification used to photograph both eyes simultaneously. With a digital SLR, the exact magnification will vary with the actual size of the image sensor. Choose a ratio that will frame both eyes together. Focusing with either system can be accomplished by moving forward and back from the subject (rocker focusing). While looking through the viewfinder, the photographer needs to keep the subject properly aligned in the frame. The camera should be positioned squarely in front of the subject and the eyes should be parallel in the viewfinder. Replacing the ‘generic’ focusing screen with a grid focusing screen will help keep things straight.

Grid Focusing Screen
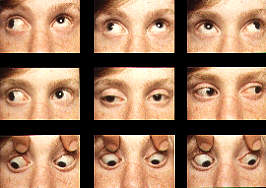
Once the subject is in focus and properly positioned in the frame, direct the patient to look in the 9 diagnostic gazes and photograph each one. Having a target for the patient to fixate on will help them focus their gaze in the proper direction. The nine gazes are: straight ahead, left, right, straight up, up and to the left, up and to the right, straight down, down and to the left, down and to the right. To get an unobstructed view of the eyes in the downgaze positions, elevate the patient’s upper lids.
Uniform picture quality is very important, so always be aware of composition throughout the series. Patient head movement should be kept to a minimum. Instruct them to keep their head straight and use only their eyes to follow the target. A chin and headrest may also be used to position the patient while doing the series. When photographing children, having them sit on their parents lap may be helpful. Movement can be minimized by having the parent gently hold the childs head in the forward position.

9 Gaze Composite
Once a 9 gaze series is completed, a composite image showing all nine views is often requested. How you create this image depends on the equipment at your disposal.
With film, the easiest way for most ophthalmic photographers to produce a composite image is using negative film for the original photography, then photographing prints of the images. After photographing the 9 diagnostic gazes, have the lab make 2" x 3" prints from the negatives. The prints can then be placed in their proper order into a nine sectioned, plastic file page. Then simply make a photographic copy of the entire page with slide film and you will have created the composite slide.
Slide film can be used if there is an automatic color printer available, such as the Fuji PictroStat. When photographing the patient on slide film, always have them look into the gazes from their right to left (right, straight ahead, left, up and to the right, straight up, up and to the left, etc). After development, cut the slides into sets of three (upgaze three, mid-line three and downgaze three). Keeping the strips in their correct position, overlap the sections at the sprocket holes and tape them together with opaquing tape. Trim off the excess tape and make an 8 x 10 color print using the color printer. Finally, copy the print using slide film and the composite slide is complete.
With digital images, composites can be made using Adobe PhotoShop®.
|
 |
|